前言
微前端框架的目的是将大型项目解耦,拆分为主子工程,各个子应用相互独立且不受技术栈的限制,便于管理、维护和开发,本文将以 qiankun为例,解析实现原理
回顾
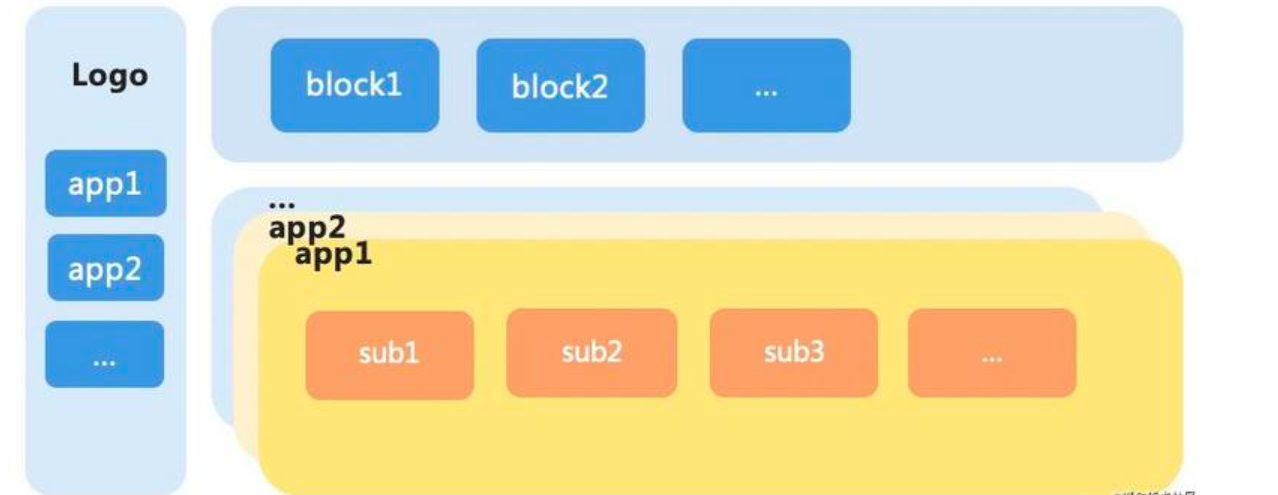
主应用,注册子应用,微前端的运行原理和 SPA 很相似
1
2
3
4
5
6
7
8
9
10
11
12
|
registerMicroApps([
{
name: 'app-react',
entry: '//localhost: 9001',
container: '#subapp-container',
activeRule: '/subapp/app-react',
},
])
start();
|
子应用如何接入?
子应用不需要安装任何包,但需要导出三个必要的生命周期函数。bootstrap 渲染之前;mount 渲染函数; unmount 卸载函数。
注意:生命周期函数必须返回 Promise
1
2
3
4
5
6
7
8
9
10
11
12
13
14
15
16
17
18
19
20
21
22
23
24
25
26
27
28
|
let instance = null;
function render(props) {
const {container } = props
instance = new Vue({
render: (h) => h(app)
}).$mount(container ? container.querySelector('#app') : '#app')
}
export async function bootstrap() {
console.log('[vue] vue app bootstrap')
}
export async function mount(props) {
console.log('[vue] vue app mount')
render(props)
}
export async function unmount () {
instance.$destroy()
instance.$el.innerHTML = ''
instance = null
}
if (!window._POWERED_BY_QIANKUN_) {
mount({})
}
|
- 允许跨域
打包工具需要增加如下配置
webpack, 子应用必须要打包成一个库文件,库的格式必须是 umd
1
2
3
4
5
6
7
8
9
| const packageName = require('./package.json').name;
module.exports = {
output: {
library: `${packageName}-[name]`,
libraryTarget: 'umd',
jsonpFunction: `webpackJsonp_${packageName}`,
},
};
|
运行原理
1
2
3
4
5
6
7
8
9
10
11
12
13
| let _apps = []
export const getApps = () => _apps
export const registerMicroApps = (apps) => {
apps = apps
}
export const start = () => {
rewriteRouter()
handleRouter()
}
|
监视路由变化
- hash 路由 window.hashchange
- history 路由
history.go / history.back/ history.forward => 使用 popstate 事件
popstate 只能监视到以上几个,但是切换到不同的子应用属于pushState (添加历史记录),而 pushState replaceState 需要通过函数重写的方式进行劫持:
1
2
3
4
5
6
7
8
9
10
11
12
13
14
15
16
17
18
19
20
21
22
23
24
25
26
27
28
29
30
31
32
33
34
35
36
37
38
| let preRouter = ''
let nextRoute = window.location.pathname
export const getPreRoute = () => prevRoute
export const getNextRoute = () => nextRoute
export const rewriteRouter = () => {
window.addEventListener('popstate', () => {
prevRoute = nextRoute
nextROute = window.location.pathname
handleRouter()
})
const rawPushState = window.history.pushState
window.history.pushState = (...args) => {
preRoute = window.location.pathname
rawPushState.apply(window.history, args)
nextRoute = window.location.pathname
console.log('监视到 pushState 变化了')
handleRouter()
}
const rawReplaceState = window.history.replaceState
window.history.replaceState = (...args) => {
preRoute = window.location.pathname
rewReplaceState.apply(window.history, args)
nextRoute = window.location.pathname
console.log('监视到 repalceState 变化了')
handleRouter()
}
}
|
处理路由变化
1
2
3
4
5
6
7
8
9
10
11
12
13
14
15
16
17
18
19
20
21
22
23
24
25
26
27
28
29
30
31
32
33
34
35
36
37
38
39
40
41
42
43
44
45
46
47
48
49
50
51
52
53
54
55
56
57
58
59
60
| export const handleRouter = () => {
const apps = getApps()
const prevApp = apps.find(item => {
return getPrevRoute().startsWith(item.activeRule)
})
const nextApp = apps.find(item => {
return getNextRoute().startsWith(item.activeRule)
})
console.log('handleRouter')
console.log(window.location.pathname)
const app = apps.find(item => window.location.pathname.startWith(item.activeRule))
if (prevApp) {
await unmount(prevApp)
}
if (!app) {
return
}
const container = document.querySelector(app.container)
const { template, getExternalScripts, execScripts } = await importHTML(app.entry)
container.appendChild(template)
window._POWRED_BY_QIANKUN_ = true
window.__INJECTED_PUBLIC_PATH__ = app.entry + '/'
const appExports = await execScripts()
app.bootstrap = appExports.bootstrap
app.mount = appExports.mount
app.unmount = appExports.unmount
await bootstrap(app)
await mount(app)
}
async function bootstrap (app) {
app.bootstrap && await app.bootstrap()
}
async function mount (app) {
app.mount && await app.mount({
container: document.querySelector(app.container)
})
}
async function unmount (app) {
app.unmount && await app.unmount({
container: document.querySelector(app.container)
})
}
|
资源获取
1
| export const fetchResource = url => fetch(url).then(res => res.text())
|
当节点被替换了,但是页面不会显示出来,这是为何?
- 客户端渲染需要通过执行Javascript 来生成内容
- 处于浏览器的安全考虑,innerHTML 中的 js 代码不会执行
解决办法:手动加载子应用的 script, 使用 eval 或者 new Function
1
2
3
4
5
6
7
8
9
10
11
12
13
14
15
16
17
18
19
20
21
22
23
24
25
26
27
28
29
30
31
32
33
34
35
36
37
38
39
40
41
42
43
| export const importHTML = async (url) => {
const html = await fetchResource(url)
const template = document.createElement('div')
template.innerHTML = html
const scripts = template.querySelectorAll('script')
async function getExterrnalScripts () {
return Promise.all(Array.from(scripts.map(script => {
const src = script.getAttribute('src')
if (!src) {
return Promise.resolve(script.innerHTML)
} else {
return fetchResource(
src.startswith('http') ? src : `${url}${src}`
)
}
})))
}
async function execScripts () {
const scripts = await getExternalScripts()
scripts.forEach(code => {
eval(code)
})
const module = { exports: {}}
const exports = module.exports
return module.exports
}
return {
template,
getExternalScripts,
execScripts
}
}
|
关于图片加载不出来
webpack 打包时,publicPath 默认为 /,一种做法时写死域名,但是不推荐,好的写法是 webpack 支持运行时的 publicPath
在子应用入口文件加载
1
2
3
4
| if (window.__POWERED_BY_QIANKUN__) {
__Webpack_public_path__ = window.__INJECTED_PUBLIC_PATH__
}
|
CSS 样式隔离
qiankun 通过shadow-dom来进行样式隔离
1
2
3
4
5
6
| start({
sandbox: {
}
})
|
JS 沙箱
解决 js 变量的冲突,qiankun 作沙箱隔离主要分为三种:
- legacySandBox
- proxySandBox
- snapshotSandBox。
其中 legacySandBox、proxySandBox 是基于 Proxy API 来实现的,在不支持 Proxy API 的低版本浏览器中,会降级为 snapshotSandBox。在现版本中,legacySandBox 仅用于 singular 单实例模式,而多实例模式会使用 proxySandBox。
legacySandBox
legacySandBox 的核心思想是什么呢?legacySandBox 的本质上仍是操做 window 对象,可是他会存在三个状态池,分别用于子应用卸载时还原主应用的状态和子应用加载时还原子应用的状态:浏览器
- addedPropsMapInSandbox: 存储在子应用运行时期间新增的全局变量,用于卸载子应用时还原主应用全局变量;
- modifiedPropsOriginalValueMapInSandbox:存储在子应用运行期间更新的全局变量,用于卸载子应用时还原主应用全局变量;
- currentUpdatedPropsValueMap:存储子应用全局变量的更新,用于运行时切换后还原子应用的状态;
咱们首先看下 Proxy 的 getter / setter:
1
2
3
4
5
6
7
8
9
10
11
12
13
14
15
16
17
18
19
20
21
22
23
24
25
26
27
28
29
30
31
32
33
34
35
36
37
| const rawWindow = window;
const fakeWindow = Object.create(null) as Window;
const proxy = new Proxy(fakeWindow, {
set(_: Window, p: PropertyKey, value: any): boolean {
if (sandboxRunning) {
if (!rawWindow.hasOwnProperty(p)) {
addedPropsMapInSandbox.set(p, value);
} else if (!modifiedPropsOriginalValueMapInSandbox.has(p)) {
const originalValue = (rawWindow as any)[p];
modifiedPropsOriginalValueMapInSandbox.set(p, originalValue);
}
currentUpdatedPropsValueMap.set(p, value);
(rawWindow as any)[p] = value;
return true;
}
return true;
},
get(_: Window, p: PropertyKey): any {
if (p === "top" || p === "window" || p === "self") {
return proxy;
}
const value = (rawWindow as any)[p];
return getTargetValue(rawWindow, value);
},
});
|
接下来看下子应用沙箱的激活 / 卸载:
1
2
3
4
5
6
7
8
9
10
11
12
13
14
15
16
17
18
19
|
active() {
if (!this.sandboxRunning) {
this.currentUpdatedPropsValueMap.forEach((v, p) => setWindowProp(p, v));
}
this.sandboxRunning = true;
}
inactive() {
this.modifiedPropsOriginalValueMapInSandbox.forEach((v, p) => setWindowProp(p, v));
this.addedPropsMapInSandbox.forEach((_, p) => setWindowProp(p, undefined, true));
this.sandboxRunning = false;
}
|
因此,总结起来,legacySandBox 仍是会操做 window 对象,可是他经过激活沙箱时还原子应用的状态,卸载时还原主应用的状态来实现沙箱隔离的。
proxySandBox
在 qiankun 中,proxySandBox 用于多实例场景。什么是多实例场景,这里我简单提下,通常咱们的中后台系统同一时间只会加载一个子应用的运行时。可是也存在这样的场景,某一个子应用聚合了多个业务域,这样的子应用每每会经历多个团队的多个同窗共同维护本身的业务模块,这时候即可以采用多实例的模式聚合子模块(这种模式也能够叫微前端模块)。
回到正题,和 legacySandBox 最直接的不一样点就是,为了支持多实例的场景,proxySandBox 不会直接操做 window 对象。而且为了不子应用操做或者修改主应用上诸如 window、document、location 这些重要的属性,会遍历这些属性到子应用 window 副本(fakeWindow)上,咱们首先看下建立子应用 window 的副本:
1
2
3
4
5
6
7
8
9
10
11
12
13
14
15
16
17
18
19
20
21
22
23
24
25
26
27
28
29
30
31
32
33
34
35
36
37
38
39
| function createFakeWindow(global: Window) {
const propertiesWithGetter = new Map<PropertyKey, boolean>();
const fakeWindow = {} as FakeWindow;
Object.getOwnPropertyNames(global)
.filter((p) => {
const descriptor = Object.getOwnPropertyDescriptor(global, p);
return !descriptor?.configurable;
})
.forEach((p) => {
const descriptor = Object.getOwnPropertyDescriptor(global, p);
if (descriptor) {
const hasGetter = Object.prototype.hasOwnProperty.call(
descriptor,
"get"
);
if (hasGetter) propertiesWithGetter.set(p, true);
rawObjectDefineProperty(fakeWindow, p, Object.freeze(descriptor));
}
});
return {
fakeWindow,
propertiesWithGetter,
};
}
|
接下来看下 proxySandBox 的 getter/setter:
1
2
3
4
5
6
7
8
9
10
11
12
13
14
15
16
17
18
19
20
21
22
23
24
25
26
27
28
29
30
31
32
33
34
35
36
37
38
39
40
41
42
43
44
45
46
47
48
49
50
51
52
53
| const rawWindow = window;
const { fakeWindow, propertiesWithGetter } = createFakeWindow(rawWindow);
const descriptorTargetMap = new Map<PropertyKey, SymbolTarget>();
const hasOwnProperty = (key: PropertyKey) =>
fakeWindow.hasOwnProperty(key) || rawWindow.hasOwnProperty(key);
const proxy = new Proxy(fakeWindow, {
set(target: FakeWindow, p: PropertyKey, value: any): boolean {
if (sandboxRunning) {
target[p] = value;
updatedValueSet.add(p);
interceptSystemJsProps(p, value);
return true;
}
return true;
},
get(target: FakeWindow, p: PropertyKey): any {
if (p === Symbol.unscopables) return unscopables;
if (p === "top" || p === "window" || p === "self") {
return proxy;
}
if (p === "hasOwnProperty") {
return hasOwnProperty;
}
const proxyPropertyGetter = getProxyPropertyGetter(proxy, p);
if (proxyPropertyGetter) {
return getProxyPropertyValue(proxyPropertyGetter);
}
const value = propertiesWithGetter.has(p)
? (rawWindow as any)[p]
: (target as any)[p] || (rawWindow as any)[p];
return getTargetValue(rawWindow, value);
},
});
|
接下来看下 proxySandBox 的 激活 / 卸载:
1
2
3
4
5
6
7
8
9
10
11
| active() {
this.sandboxRunning = true;
activeSandboxCount++;
}
inactive() {
clearSystemJsProps(this.proxy, --activeSandboxCount === 0);
this.sandboxRunning = false;
}
|
可见,由于 proxySandBox 不直接操做 window,因此在激活和卸载的时候也不须要操做状态池更新 / 还原主子应用的状态了。相比较看来,proxySandBox 是现阶段 qiankun 中最完备的沙箱模式,彻底隔离了主子应用的状态,不会像 legacySandBox 模式下在运行时期间仍然会污染 window。
snapshotSandBox
最后一种沙箱就是 snapshotSandBox,在不支持 Proxy 的场景下会降级为 snapshotSandBox,如同他的名字同样,snapshotSandBox 的原理就是在子应用激活 / 卸载时分别去经过快照的形式记录/还原状态来实现沙箱的。
源码很简单,直接看源码:
1
2
3
4
5
6
7
8
9
10
11
12
13
14
15
16
17
18
19
20
21
22
23
24
25
26
27
28
29
30
31
32
33
34
| active() {
if (this.sandboxRunning) {
return;
}
this.windowSnapshot = {} as Window;
iter(window, prop => {
this.windowSnapshot[prop] = window[prop];
});
Object.keys(this.modifyPropsMap).forEach((p: any) => {
window[p] = this.modifyPropsMap[p];
});
this.sandboxRunning = true;
}
inactive() {
this.modifyPropsMap = {};
iter(window, prop => {
if (window[prop] !== this.windowSnapshot[prop]) {
this.modifyPropsMap[prop] = window[prop];
window[prop] = this.windowSnapshot[prop];
}
});
this.sandboxRunning = false;
}
|
总结起来,对当前的 window 和记录的快照作 diff 来实现沙箱